Can you really make no-bake peanut butter cheesecake balls that taste just as good as baked goods, without turning on the oven? You can! I learned to cook as a child from my mother, a nurse. Standing in the kitchen with her and watching her help me learn from mistakes, understand why they happened, what to do to fix them, and what the final result should be.
That’s how my passion for cooking began. We would make easy no-bake desserts together, and she would whisper her tips. My mind would take in every detail. These are my favorite easy no-bake holiday treats quick, rich, and a treasure trove of memories.
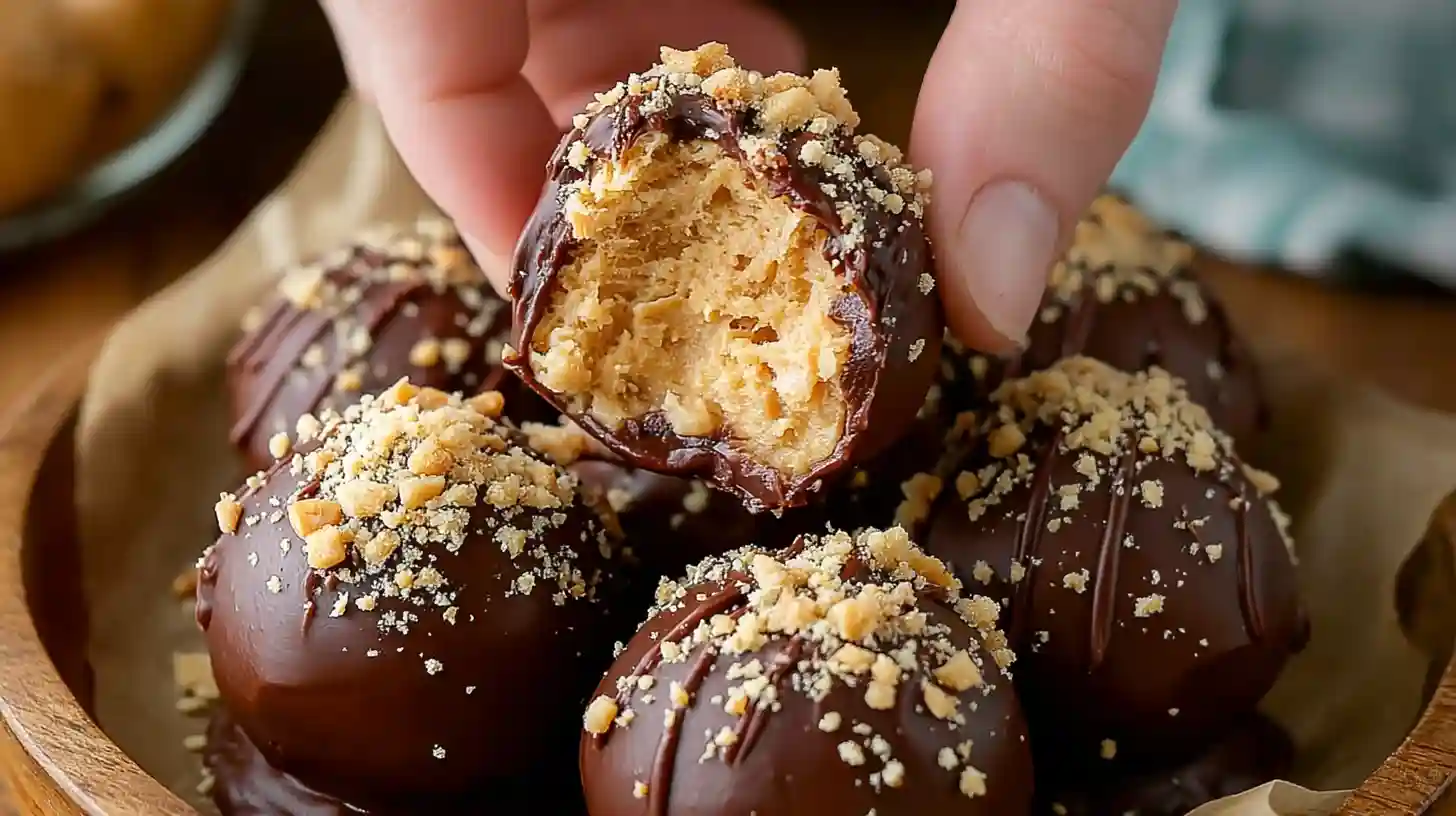
My No-Bake Reset: Creamy Peanut Butter Meets Chocolate Bliss
- These No-Bake Peanut Butter Cheesecake Balls are the kind of quick no bake peanut butter snacks I reach for when I need comfort without the chaos.
- They’re creamy, rich, and quiet every craving. No oven, no stress just peanut butter, chocolate, and that first soft bite.
The Ingredients No-Bake Peanut Butter Cheesecake Balls

- 8 oz cream cheese, softened
- 1 cup creamy peanut butter
- 1 cup powdered sugar
- 1 tsp vanilla extract
- 1 ½ cups graham cracker crumbs
- 8 oz semi-sweet chocolate or chocolate chips, melted
- 2 tbsp coconut oil (optional – to thin the chocolate)
- Crushed peanuts or sprinkles for garnish (optional)
Stuffani’s Memory
My mother taught me that the basic ingredients are essential, but they can be modified according to what you have available in your kitchen. You’ll achieve magic. Experience is the treasure.
Instructions No-Bake Peanut Butter Cheesecake Balls
Step 1: Prepare the Filling
Beat together the softened cream cheese, peanut butter, powdered sugar, and vanilla in a large mixing bowl until smooth and creamy.

Stuffani’s Creamy Slip-Up
Problem: My filling came out gritty once. Totally threw off the texture.
Cause: I used refrigerated peanut butter straight from the jar it hadn’t softened at all.
Solution: I now bring all ingredients to room temp before mixing. That helps them blend like silk.
Result: The filling becomes fluffy and smooth like mousse. It’s the same trick I use for my Peanut Butter Cheesecake Donut too. Creamy, not crumbly.
Step 2: Add Graham Cracker Crumbs
Fold the crumbs into the filling slowly, a bit at a time. The mixture should firm up enough to roll into balls without sticking to your hands.

Stuffani’s Crumb Chaos
Problem: My first batch wouldn’t hold it collapsed in my palms.
Cause: I didn’t add enough crumbs, thinking I could “eyeball” it.
Solution: I now add the full 1½ cups, then test by pressing a scoop in my hand. If it sticks without crumbling, it’s ready.
Result: The texture becomes perfect for shaping. Just like my base in the No-Bake Twix Slice firm, but still soft inside.
Step 3: Form the Balls
Scoop out 1-inch portions and roll them into balls. Set them on a parchment-lined tray.

Stuffani’s Sticky Situation
Problem: They stuck to my palms and came out all misshapen.
Cause: I was rolling them bare-handed in a warm kitchen.
Solution: I chill the mix for 15 minutes before shaping, and lightly dampen my hands with cold water.
Result: Smooth, even spheres no sticking. It’s the same prep I follow for my No-Bake White Chocolate Cranberry Oat Clusters.
Step 4: Chill the Balls
Refrigerate for at least 30 minutes until firm.

Stuffani’s Patience Problem
Problem: I once dipped them too soon. They fell apart in the chocolate.
Cause: I got ahead of myself and skipped the full chill.
Solution: Now I set a timer 30 minutes minimum, or 15 in the freezer.
Result: They firm up properly and hold their shape. That chill time is gold don’t rush it.
Step 5: Melt the Chocolate
Combine chocolate chips and coconut oil in a bowl. Microwave in 30-second bursts, stirring between each, until melted and smooth.

Stuffani’s Seized Disaster
Problem: My chocolate turned thick and clumpy unusable.
Cause: I forgot to stir between bursts, and it overheated.
Solution: Stir every single time. And never go over 30 seconds.
Result: Glossy, pourable chocolate just right for dipping. I use this same method for my ganache on the M&M Snickers Cheesecake too. It’s foolproof now.
Step 6: Dip and Decorate
Use a fork or toothpick to dip each chilled ball into the melted chocolate. Let excess drip off. Place on parchment. Top with peanuts or sprinkles while wet.

Stuffani’s Garnish Fumble
Problem: I used to sprinkle too late everything slid off.
Cause: I dipped all the balls first, then tried garnishing them.
Solution: I now dip and garnish immediately, one at a time.
Result: The toppings stick, stay crisp, and look stunning.
Step 7: Final Chill and Serve
Chill again for 20 minutes until the chocolate sets. Let sit 10 minutes before serving for the creamiest bite.

Stuffani’s Final Chill Truth
Problem: I served them straight from the fridge hard as rocks.
Cause: I didn’t wait. I thought colder meant better.
Solution: My mom always said, “Let the food settle. It needs to wake up.”
Result: That 10-minute rest turns these healthy peanut butter cheesecake balls into little clouds of joy.
Recipe Variations and Creamy Secrets for No-Bake Perfection
Variations of No-Bake Peanut Butter Cheesecake Balls You’ll Love
- Classic Chocolate-Dipped : Smooth peanut butter and cream cheese wrapped in dark chocolate? Classic for a reason.
- Problem: My chocolate cracked right off in one bite.
- Cause: I dipped the cheesecake balls while they were still too soft.
- Solution: I now freeze them for 15 minutes before dipping just enough to firm without freezing solid.
- Result: A crisp, clean shell that clings like it should. I use this same method with my Crispy Cotton Candy Cheesecake Bombs, where that outer snap makes all the difference.
- Healthy Almond Version : Swap peanut butter for almond butter, and trade sugar for a splash of maple syrup.
- Problem: The mixture was too runny and wouldn’t hold its shape.
- Cause: Almond butter has less structure and maple syrup thins it out even more.
- Solution: I added ¼ cup extra graham crumbs and chilled it twice as long.
- Result: Smooth texture, nutty flavor, and a naturally sweet finish.
- Salted Caramel Crunch : A drizzle of caramel on top, crushed pretzels to finish.
- Problem: My caramel disappeared it melted right into the cheesecake.
- Cause: I topped them while the filling was still soft.
- Solution: Now I let the balls chill fully, then drizzle once they’re cold.
- Result: A layer that stays put and delivers that perfect salty-sweet contrast. Even my dad, who isn’t big on sweets, asked if I had more. A moment I’ll never forget.
- Cookies & Cream : Fold crushed Oreos into the filling for a soft, familiar crunch.
- Problem: It turned into a gray paste not pretty.
- Cause: I overmixed and broke down the cookies too much.
- Solution: I now fold gently, just three or four turns, then stop.
- Result: Creamy cheesecake with visible cookie swirls. My son said it tasted like “milk and cheesecake had a sleepover.”
Stuffani’s Whisper
I didn’t come up with these variations because I’m clever. I came up with them because I messed up. I misread labels. I grabbed the wrong jar. I didn’t chill long enough. But each time, I adjusted. I listened to the recipe like my mom taught me: “Food tells you what it needs if you’re paying attention.”
Secrets for Perfect Creamy Peanut Butter Cheesecake Balls
- Cream Cheese Temperature : Always bring cream cheese to room temp before mixing.
- Problem: I ended up with lumps that wouldn’t go away.
- Cause: Cold cream cheese doesn’t blend well with sugar.
- Solution: I now leave it on the counter while I prep everything else.
- Result: A silky base with no grit, just like in my No-Bake Banana Split Cheesecake because the base makes the bite.
- Peanut Butter Type : Stick with creamy, shelf-stable peanut butter.
- Problem: My balls crumbled instead of rolling smooth.
- Cause: Natural peanut butter separated and made the mix unstable.
- Solution: I added a tablespoon of soft butter to bind everything back together.
- Result: Smooth, shapable filling every time. It reminds me of the base I use in my graham cracker peanut butter truffles a dessert built on balance.
- Chocolate Coating : Always mix in a little coconut oil for that glossy finish.
- Problem: My chocolate seized and turned dull.
- Cause: I used chocolate chips alone, with no added fat.
- Solution: I add 1 tablespoon of coconut oil before melting every time.
- Result: A glossy shell that dips and sets without streaks. The kind that gets compliments even before the first bite.
- Flavor Layering : A pinch of salt and a splash of vanilla go a long way.
- Problem: My early versions tasted flat, like sugar and not much else.
- Cause: I skipped the salt and forgot the vanilla.
- Solution: Now I add both even when I’m in a rush.
- Result: Deeper, richer flavor. You taste the cream, the peanut butter, the warmth. It’s layered, not just sweet. That’s how I build every flavor.
Stuffani’s Whisper
I didn’t learn these secrets in culinary school I learned them one kitchen mess at a time. From cakes that caved in and balls that melted in a car ride. My mom never scolded. She just handed me a spoon and said, “Well, what do you think we should try next?”
Make It Yours (Swaps & Family Stories)
Real Swaps That Feel Like Home
- Problem: No cream cheese in the fridge.
- Solution: I mixed full-fat Greek yogurt with a splash of heavy cream and a spoon of cornstarch. Then gently warmed it just until it thickened.
- Result: A little tangier than usual but it reminded me of the filling in my Mini No-Bake Banana Split Cups. Less classic, more character.
- Problem: Ran out of graham crackers for the crust.
- Solution: I grabbed pretzels and crushed digestive biscuits from the pantry. Added a touch of brown sugar.
- Result: More crunch, and the salty snap from the pretzels paired so beautifully with the peanut butter. It gave the base more personality.
- Problem: No chocolate chips left for dipping.
- Solution: I melted down two dark chocolate bars I’d hidden for “mom emergencies.” Stirred in a little coconut oil to smooth it out.
- Result: Thinner, glossier shell with a rich flavor and clean snap. It tasted deeper, not just sweet. And truthfully? Better than what I’d planned.
Stuffani’s Whisper
These swaps didn’t come from some chef’s book. They came from fridge dives, budget days, and needing dessert when life was heavy. My mom always said, “Cook from what you’ve got. You’ll surprise yourself.”
Easy Touches That Tell Your Story
- Need more crunch? Roll your dipped cheesecake balls in crushed peanuts or crispy rice cereal before the final chill.
- Want more protein? Add a scoop of vanilla protein powder. Just ease back the sugar and fold in a bit more cream.
- Missing depth? A dash of espresso powder in your melted chocolate will wake the whole flavor up.
- Craving a summer spin? Stir a spoon of raspberry jam into the cheesecake base.
Stuffani’s Whisper
All of these started as simple best desserts. But every mistake I made and every fix turned them into family traditions.
Troubleshooting And Nutrition & Dietary Notes
Common Problems & Fixes
| Problem | Cause | Fix |
|---|---|---|
| Mixture too soft | Cream cheese too warm | Chill 15 minutes, then shape |
| Chocolate cracking | Balls too cold during dip | Let stand 3–4 minutes before coating |
| Coating too thick | Chocolate overheated | Add ½ tsp coconut oil and stir |
| Gritty texture | Over-mixed sugar | Sift sugar before blending |
| Peanut butter overpowering | Used natural PB | Reduce to ¾ cup or balance with cream cheese |
Stuffani’s Tip
Every mistake is a small test. I remember my mother saying, “Don’t let mistakes stop you; we learn from them.” Just think about the mouths waiting at the table, waiting for you to come from the kitchen with the sweets.
Health & Substitution Options
| Version | Calories | Key Notes |
|---|---|---|
| Classic | ~160 kcal each | Standard cream cheese & PB |
| Light | ~120 kcal | Low-fat cream cheese + stevia |
| Vegan | — | Coconut oil, vegan cream cheese |
| Gluten-Free | — | Use GF graham crumbs |
| Protein | — | Add 2 tbsp protein powder |
Stuffani’s Whisper
You can adapt these easy no-bake peanut butter desserts however you like, as everyone in every household has a different dietary preference. Therefore, you’ll satisfy all tastes, and everyone will be happy to eat at the table.
Storage, Freezing and Serving Suggestions
How to Store and Reheat (Well, Chill!) Cheesecake Balls
- Make Ahead
- Problem: I once thought I’d save time by shaping and dipping everything the night before a party.
- Cause: I didn’t realize the chocolate coating would get dull and crack by morning.
- Solution: Now, I prep just the cheesecake filling ahead up to 2 days and keep it in the fridge, sealed tight. The coating happens same day.
- Result: The chocolate stays glossy, and the texture? Still soft inside
- Fridge
- Problem: I once stored finished cheesecake balls on a plate, uncovered.So it absorbed all the smells in the refrigerator. It now tastes like beans.
- Solution: Never again. I use a tall airtight container and line each layer with parchment paper.
- Result: They stay fresh for up to 7 days no odd flavors, no stickiness. That tip saved my Strawberry Crunch Cheesecake Bites once during a summer potluck too.
- Freezer
- Problem: Froze a full batch once and didn’t separate the layers.
- Cause: I stacked them in a zip bag thinking they’d pop apart.
- Solution: Now I freeze them on a tray first, then transfer to bags with parchment between each.
- Result: They last 2 months, and I just grab what I need when those sweet cravings hit.
- Thaw
- Problem: I once served them straight from the freezer to save time.The atmosphere turned chaotic; the cold made my children cry from the intense pain in their teeth.
- Solution: I let them sit at room temp for 10–12 minutes now just enough to soften without melting.
- Result: That creamy bite hits just right. Not frozen solid, not mushy.
Stuffani’s Note
I used to think prep was a task to finish, not something to protect. But cold desserts are delicate. You rush them, they break. You baby them, they shine.
How to Serve No-Bake Peanut Butter Cheesecake Balls
- Dessert Boards
- My daughter calls these “the golden ones.” I add them to boards with fruit, fudge bites, and shortbread. They’re always the first to go.
- Holiday Platters
- I once rolled these in red and green sugar for Christmas Eve. My niece thought they were “snowball cookies with secrets.” And they were. The peanut butter center’s always a surprise.
- Perfect Pairings
- Coffee for me. Milk for the kids. My husband? He swears by an espresso martini and two of these after dinner.
- Mini Dessert Cups
- I’ve done two cheesecake balls on a skewer with whipped cream in tiny cups for bridal showers. Elegant. Easy. Everyone thought I ordered them.
Stuffani’s Whisper
These aren’t just quick no bake desserts. They’re small, soft reminders that something simple can still feel special. Every bite is a little pause in the day something creamy, something kind.
For more recipes follow me on pinterest and Facebook
FAQs No-Bake Peanut Butter Cheesecake Balls
Can I use natural peanut butter?
You can, but it’s drier and less sweet. I balance it by adding a bit more cream cheese or 1 teaspoon of melted butter.
How do I make this recipe dairy-free?
Use dairy-free cream cheese and vegan chocolate. For the filling, coconut cream adds a rich texture.
Can I make these into bars instead of balls?
Yes, press the base into a pan, layer the filling, add peanut butter, then chill and top with chocolate. Slice into squares.
Can I double the recipe for a crowd?
Totally. Just space them out when chilling so they don’t stick parchment helps.
Conclusion No-Bake Peanut Butter Cheesecake Balls
- And just like that, dessert is done no oven, no stress.
- These no-bake peanut butter cheesecake balls are my go-to sweet escape.
- They’re easy, comforting, and always disappear fast from the plate.
- Make them once, and you’ll understand why we never stop at one.

No-Bake Peanut Butter Cheesecake Balls Easy, Creamy & Freezer-Friendly!
- Prep Time: 15 minutes
- Cook Time: 0 minutes
- Total Time: 45 minutes
- Yield: 24 cheesecake balls
- Category: Dessert
- Method: No-Bake
- Cuisine: American
- Diet: Vegetarian
Description
These no-bake peanut butter cheesecake balls are creamy, chocolatey, and irresistibly easy. Perfect for quick summer desserts, potluck favorites, and high-protein no-bake snacks.
Ingredients
8 oz cream cheese, softened
1 cup creamy peanut butter
1 cup powdered sugar
1 tsp vanilla extract
1 ½ cups graham cracker crumbs
8 oz semi-sweet chocolate or chocolate chips, melted
2 tbsp coconut oil (optional – to thin the chocolate)
Crushed peanuts or sprinkles for garnish (optional)
Instructions
1. In a large bowl, beat together softened cream cheese, peanut butter, powdered sugar, and vanilla extract until smooth.
2. Fold in graham cracker crumbs gradually until the mixture holds its shape.
3. Scoop and roll into 1-inch balls. Place on a parchment-lined tray.
4. Chill the peanut butter balls in the fridge for 30 minutes or until firm.
5. Melt chocolate chips with coconut oil in 30-second intervals, stirring between each.
6. Dip each chilled ball into the melted chocolate and top with crushed peanuts or sprinkles while wet.
7. Chill again for 15–20 minutes until chocolate is set. Let sit 10 minutes before serving for the creamiest texture.
Notes
For a protein boost, add 1 scoop of vanilla protein powder and reduce powdered sugar slightly.
Use almond butter instead of peanut butter for a different twist.
Store in an airtight container in the fridge for up to 1 week or freeze for up to 2 months.
These are perfect for bite-size party desserts, lunchbox treats, or holiday dessert boards.
Nutrition
- Serving Size: 2 balls
- Calories: 180
- Sugar: 12g
- Sodium: 110mg
- Fat: 11g
- Saturated Fat: 4g
- Unsaturated Fat: 6g
- Trans Fat: 0g
- Carbohydrates: 16g
- Fiber: 1g
- Protein: 4g
- Cholesterol: 15mg
Keywords: no-bake peanut butter cheesecake balls, best no-bake desserts, quick sweet treats, high protein snacks, peanut butter truffles